Awesome

Saturday, December 31, 2011

Make a Desk Calendar with CTMH!

Ah, home sweet home, where we get to decorate to our heart’s delight! Add these beautiful DIY dècor pieces to your home to live inspired every day. We’ve chosen a sleek color scheme of Grey Flannel, Black, and White Daisy, with a pop of Pear, and we used the graphic flowers from the My Acrylix® Dreamin’ Workshop set to add subtle texture to the White Daisy paper in the desk calendar and art canvas. Here are a few hints for you as you create these chic projects.
Desk Calendar
Desk Calendar
  • Create the triangular base of this calendar by folding a 12" × 12" piece of chipboard at the 3" and 7 1/2" marks.
  • Insert three pins from the Bling assortment (Z1466) and clip the sharp ends if they protrude too much. (Tip: You can use hot glue on the back to anchor the pins.)
  • Cut twelve 3 1/2" scalloped squares from Pear cardstock using the shape on the Cricut® Art Philosophy cartridge (Z1686) and sponge the edges with Pear ink.
  • Cut twelve 3 1/2" squares from Grey Flannel cardstock and sponge edges with Grey Flannel ink.
  • Use the 3" chipboard squares from the My Creations® memory game (Z1614) for the date tiles. Stamp the background flower pattern in second generation using Grey Flannel ink and then stamp the month or numbers with black StazOn® ink. Sponge the edges with Grey Flannel ink. (Tip: Stamp two of numbers 1 and 2. Stamp one each of numbers 3 – 9 and 0.)
  • Back each month and date tile with the 24 pieces of cardstock and then punch a hole in the top for easy hanging.

Saturday, December 17, 2011

Paper Art Quilt

Paper Art Quilt Idea:
Hey there, I was cruising around on the net and came across this super cool idea! Its a quilt... using paper and canvas!
I saw this idea over on the website http://retrospection.typepad.com/my_weblog/2011/05/a-paper-quilt-via-canvas.html. If you want to see the whole tutorial, just click on the link. The basic idea is running 100+ squares of multi-color paper through your sewing machine and attaching them to a canvas to make a groovy quilt!
It's so easy it's just the thing for your home too!

Different decoration ideas would be ...
Having it over your mantle.
Above your couch.
In a kitchen dining nook.
In the babies nursery.
The possibilities are really endless!

Monday, December 5, 2011

Ribbon Organization Idea

I found this super great idea for ribbon organization!!! I love this. I have some of these baskets and I'm going to do this too. I have one ribbon organization going on now but I am always getting more ribbon.
What do YOU think? This is something anyone can do! Just get these materials: basket, dowel smaller than holes) and ribbon!
 The great thing about this idea is that the ribbon does not unravel like some other organization ideas. Try it today!

Saturday, December 3, 2011

Card Workshop Card

I have a fun card workshop coming up that I design the cards for and I made this super cute card for everyone to make too! It's a tri-fold card that is scored and cut so my ladies can breeze through their projects. All the paper is pre-cut ... how great is that!
Here's a photo of the card with the dimensions I did.


1) The cardstock starts at 5.5x12


3) Cut 1.5" in from each side from score mark to score mark (2 & 10)


2) Score at 2,4,8,10"2) Score at 2,4,8,10"


4) Fold at score marks in opposite directions as shown.

When you are all finished folding, use the card as a template to cut paper. It's that easy!
When it's all done it fits in a standard A2 envelope.
Super cute! What do you think!?

Thursday, December 1, 2011

Family Tree Wall

So I found this picture online and just fell in love! The tree looks so good on its own I think but the photos added make it stunning! I am so wanting to try this in my house. Maybe using a projector to draw the tree so I don't have to freehand it! Tell me what you think!


Friday, November 4, 2011

Fun idea for Pumpkin Seeds CTMH Pumpkin Basket

Hey there all! Jeanette Lynton's blog has this super cute idea for a cute basket using a new technique with your acrylic blocks.
I am loving this little basket with the super cute pumpkin set "So Grateful" (B1395). As for the stitching, you can either do actual stitching or stamp stitching. If you don't have a stamp set with stitching lines, just use a brown sharpie marker and faux stitch to your hearts desire!

This basket is made using the Art Philosophy Cricut cartridge (Z1686). Just put the basket together and fill with roasted pumpkin seeds in a cello bag. Tie off the bag with some hemp and top it off with a cute tag. Done!

 Hope you can give it a try! Happy Crafting!

Thursday, November 3, 2011

Ribbon Tree

So this is my plan... I am going to make a ribbon tree like this. I saw a tree like this at Craft Warehouse and I thought it was the coolest thing!! What do you think?
Doesn't this look super fun and easy? Just loop the ribbon (4" strips) and pin into a styrofoam or chipboard cone. If you use a chipboard cone it may be easier to use hot glue. I'll let you know how it works out!!


'm

Wednesday, November 2, 2011

Merry Christmas with Believe CTMH Paper

This should give you something to "Believe" in! This super easy and classic Christmas card is the thing for you! Using CTMH paper "Believe" and some cardstock and a button it's so easy and simple you can make a bunch of them at once for family and friends!
Make your card base at 4.25"x5.5". Cover with pretty Holiday Red paper. Cut white cardstock at 3.25"x4.5" and scallop the bottom edge with a pretty decorative punch. Cut a square of cool Believe CTMH paper at 3x3.5" and adhere toward the top of the white paper keeping the top and sides equal. Cut a strip of Sweet Leaf CTMH cardstock at 3.5x1.5" and sand the edges. Adhere about an inch above the bottom scalloped edge of the white cardstock. Take a die cut snowflake (using CTMH Art Philosophy) and place on Sweet Leaf cardstock. Get a Holiday Red button and thread with white waxy flax or embroidery thread and place in center of snowflake. Stamp sentiment on white above scallops and you are done! How easy is that!


If you want to order any of these products, let me know. There are less than two months left till Christmas so get crafting!

Tuesday, November 1, 2011

Dreamin Paper Pack CTMH

If I have to choose a paper that personifies the month of November for me it would have to be Dreamin'.  I love the fun pattern and earthy tones that are in this paper pack.

What a great color pallet to use for fall activities like going to the Pumpkin Patch, winding your way through the Corn Mazes, or making homemade applesauce! It's the perfect time of year to go get a bushel of apples and make some sauce!
I also love the way the paper seems to make photos seem to pop right off the page.This "X" style pattern with multi colors is so beautiful but yet does not detract from the photos at all.

The last photo I'll show is a card that is so dreamy! The idea of a dandelion puff and the beautiful fall tones makes this card so perfect. Yes, I guess I am just really loving this Dreamin' Paper pack from CTMH!
I hope you have some fun making your projects and if you want to get some of this super cute paper, just let me know!

Monday, October 31, 2011

APG - Gift Card Pocket

I found this super cute card and pocket idea online and thought I'd share it with you. Watch the video below to get the instructions for making this project. If you are wanting to order this stamp set of any of the paper used in this project shown, let me know and I'll help you with that. Thanks for watching!

As our minds turn toward Christmas and giving, I look for any opportunity to make something quick and simple so that there's always a gift at hand. You never know when you might need to reciprocate or even give a trinket to someone whose spirits need lifting. Today I put together a very, very easy pocket that houses a gift card. Because the pocket and the gift card are separate, they provide lots of opportunity for embellishment. This project takes 1 piece of 12" x 12" design paper and 1 sheet of 8.5" x 11" cardstock, along with some scraps. With less than a 10 minute investment in time, you're going to a have personalized gift card pocket, ready to go.
Check out the video on how to make this super cute gift card and envelope.


Supplies used (all CTMH unless otherwise noted):
Paper:  Elemental B&T; Colonial White, Sorbet, Chocolate CS
Stamps:  Love Life, Wonderland, Card Chatter Birthday
Inks:  Sorbet, Chocolate
Embellishments:  Chocolate grosgrain, Mocha Opaques adhesive gem
Other:  1 1/4" circle punch, 2" circle punch (Fiskars), Doily Lace border punch (Martha Stewart), 3D foam tape, ScorTape (ScorPal), Score Board (Martha Stewart)


wondering how this was made

I found this photo and I am really wanting to know how it was done. Any ideas? I couldn't find any tutorial or instructions anywhere.
Help!


Sunday, October 30, 2011

Matchbook Mini Album Tutorial

Are you looking for a new idea for a mini album? This video is a great idea for a new and easy gift or brag book! Put any kind of paper on the album to dress it up for any occasion. This album is done up using paper that would be great for Christmas. Use some spooky cool paper for Halloween themes.
There are so many different options! This small album is so easy to do you can give them made up as gifts. Use lots of cool embellishments and die cuts to change up the look. Use lots of ribbon to get a fun frilly look.
How easy is this! Go ahead and try it for yourself today. Christmas is only two months away and it's time to start thinking about gifts and party favors. Happy Crafting!

Saturday, October 29, 2011

Pumpkin Doorhanger

If you want to have a cute project for Halloween tomorrow here's an idea for you. A super cute door hanger with easy pumpkins and a die cut tree. 
These cute pumpkins are easy to make using just circles and ovals. Take three circles and ink the edges. Starting with the center of the pumpkin place a circle off to the left and right of the middle pumpkin. (see photo) Do the same with three ovals. Cut a small strip with an angled top and put it behind the pumpkins at the top for the stem. Voila! You have made pumpkins! 
The die cut tree and the door hanger are done using the Art Philosophy Cricut cartridge with CTMH. 
Try yours today! Let me know how to get the new CTMH Art Philosophy cartridge. 


Friday, October 21, 2011

Sympathy Card With CTMH

Sometimes you need to have more than just thank you cards and birthday cards! This super cute Sympathy card is just perfect for anyone who has suffered a loss. This card uses The wonderful Elemental paper packet from CTMH. How cute is this! The strip of paper on the left that has circles is the new thing that CTMH has done with their paper. Each piece of patterned paper has a "zip strip"; a 1/2" strip of coordinating patterns that is attached to the top of the paper. You just slip the paper into your paper cutter and ... zip! You have a cool border for your project. Cool huh? 
This Sympathy card also us using the new CTMH Art Philosophy Cricut cartridge. The cute swirl is cut using the Cricut machine. It's so easy and great that you don't have to cut it out yourself. Also cut with the Cricut Art Philosophy cartridge is the banner at the bottom and the perfect circles. I'll bed you can't cut a more perfect circle if you tried!
If you want to make this card, send me a message to order this paper packet! And don't forget to get the awesome Art Philosophy Cricut cartridge! 
Happy Scrapping!

Thursday, October 20, 2011

Cute Card Box with CTMH

So here's a project that so easy anyone can give it a try!
Sponge all the edges of the box in a nice chocolate or cocoa ink.
Cover the surface of the box with coordinating CTMH paper.
Decorate as desired using dimensional elements and cardstock cut using the Cricut Art Philosophy cartridge. Make 3D roses and die cut shapes to stamp on.
How easy is that! Here are some other photo ideas!

Tuesday, October 18, 2011

Fall Wreath Using CTMH Art Philosophy Cricut Cartridge

So I saw this super cute wreath and I am so going to make one too! Here are the photos and instructions...
"I used all the flowers on the Art Philosophy Cricut cartridge.  I designed it on my Gypsy so if I ever wanted to do another one like in Christmas Colors or for a Wedding I wouldn't have to start all over.  I designed it in 7 different layers on my Gypsy.  Each layer is full of flowers or leaves.  I maximized each layer with different sizes to fill my mat.  On the layer with the leaves I used 5 of each leaf in different sizes.  This way I would have a few of each size in one color since i am using 12 x 12 sheets of cardstock.  I can't believe how many flowers and leaves it took.
Here is the start.  After I placed the first few flowers and leaves I thought to myself, "what were you thinking this is going to take forever".  But then I also thought, yes but it will last forever too.

"For the flowers I used 4 sheets of 7 different colors.  It is the different colors that make this wreath pop.
I did roll all the flowers first to see what the different shapes and sizes looked like before placing them on the wreath.  I added the leaves as I went along.  I thought about placing them at the end but I could tell right away that it wasn't going to work." 

"I did use the hot glue gun to attach the flowers and leaves.  I did have fun placing and replacing the flowers and leaves before I glued them down.  I am so glad that I did not choose a larger wreath. 
Half way there and I need to cut and roll more flowers. I do love how it is turning out. I guess I should have counted how many flowers and leaves it actually took.  But I bet you can see the answer would be a lot!  LOL!  I really am thinking about doing one for Christmas now.
I just love the Art Philosophy cartridge it has so many useful shapes and goodies on it.  I couldn't live without it.  OK! OK! I could but it makes my life so much easier because it is so versatile.
You can order your Art Philosophy cartridge here if you don't have one yet.
So here is the finished wreath".

Lots of work I know!  But I do love it.
Let me know what you think.
All products used are CMTH unless stated otherwise

Cardstock colors for the flowers are:
Goldrush
Autumn Terracotta
Sunset
Smoothie
Gypsy
Sunny Yellow
Sunflower
Sizes were 5, 4, 3.5,3,2.5
The leaves:  were from the Mothers Day Bouquet Cartridge
Garden Green
Olive
New England Ivy
Sizes were 2, 1.75 I cut 5 of each color they were on one layer on my Gypsy
The wreath I bought at Beverly's it's 12".
Hot Glue I had on hand.


Pictures and instructions found at http://michelesinkitstampit.blogspot.com/

Monday, October 17, 2011

CTMH Mischeif Paper Pack


October is the perfect month to use the Mischief Paper with CTMH.  This paper is perfect for doing Halloween layouts and cards. CTMH paper is nice cardstock weight and has two different patterns on each sheet. You can make the look any way you want it, either subtle or totally spooky! Check out these photos I found of artwork using the Mischief Paper from Close to my Heart!                           What kind of projects do you like to use themed papers for? Do you like having paper that is versatile enough to use for a non-holiday? I know many people who don't really do Halloween but they like doing projects for Thanksgiving. It can be hard to find papers out there sometimes that are easy to transition from one holiday to the other. I like this layout that used the stripes side of the Mischief paper.


Sunday, October 16, 2011

Cute and Tiny!

I am thinking that bigger is not always better. Take shrimp, for instance… they are so small but so tasty with butter, or fried with that red sauce they serve it with! And babies! They are so cute and cuddly when they are small but they grow up (too quickly) and you are left with a big kid who you can’t pick up under one arm and tote around.
True, there are good things about big kids, they walk on their own, pick up their own toys, feed themselves and so on, but there is nothing like the tiny baby!
Tiny cards are awesome too! They are so cute and pack a punch in spite of their size. Check out the small ornament cards right now! They are so fun to make and pretty easy too! I used my Cricut machine to cut the ornaments and did some extra distressing, added some bling, ribbon and voila! Super cute cards. They can be adapted to be gift tags too, if that's what you need. Go and have some fun with tiny cards and tags!
Happy Scrapping!

Saturday, October 15, 2011

Adorable Mobile Art with CTMH


Paper Mobile
Crafting this lightweight mobile is a cinch when you use two packages of Dimensional Element On Target (Z1226) chipboard circles, a 1 1/4" circle punch (Z1311), and the My Acrylix® Hot Diggity (C1407) stamp set.
  • Stamp owl five times each in Crème Brulee, Sorbet, and Juniper on Colonial White cardstock; trim. Turn cut-out image over and stamp on the blank side.
  • Punch 10 pairs of circles each from Elemental (Crème Brulee and Sorbet) and Typeset (Juniper) B&T Duos papers. Attach pairs of matching circles together to hide back of B&T.
  • Leaving space between each element, use a sewing machine to stitch through centers of circles or owls. Be sure to leave extra thread at the top.
  • Take the largest scallop circle from each Dimensional Elements package and sponge surface with Sorbet ink. Sponge edges with Cocoa ink, if desired.
  • Create the top of the mobile as follows:
    • Flip one of the scallop circles upside down so the sponged surface is facing away from you.
    • Tie bow in ribbon and secure ends with Liquid Glass to the white side of the Dimensional Element scallop circle. We used the dotted ribbon from the Designer Ribbon Colonial White collection (Z1126).
    • Use piercing tool to punch nine evenly spaced holes on the same white side of the Dimensional Elements scallop circle. Pull thread through each hole, starting under the circle on the sponged side; knot to secure.
    • Use Liquid Glass to attach second Dimensional Elements circle to first, placing white sides together and sandwiching thread ends and ribbon.
  • Alternate idea: If you’d like to use more of your Dimensional Elements circles, simply incorporate them in the mobile by switching out some of the punched circles or stamped owls. All you’ll do is match up sizes from each package, sponge or cover them with B&T paper, attach thread to center of one on white side, and then attach the white sides together. Simple!
All Products used are CTMH (Close to my Heart)

Friday, October 14, 2011

Adorable Wall Hanging Owl on Canvas


Home décor just took on a whole new level of cuteness! These quick and easy owl-themed projects are a great way to bring a smile to the faces of all who see them.

Canvas Wall Hanging
Create this paper-pieced owl—isn’t he a cutie?—then attach it to a 12" x 12" canvas (available at your local craft store). Here are some tips:
  • Cut the pieces freehand or print some clip art from the Internet for a pattern. We used the flower stamp from My Acrylix® Fill in the Blank (D1465) as a template for the feet, and used the
    1 1/4" circle punch (Z1311) to punch the eyes from Cocoa cardstock.
  • We wanted to add Juniper to the artwork, so we added the Typeset Juniper damask B&T Duos® paper to the Sorbet, Crème Brulee, and Olive B&T papers from Elemental.
  • For the background, score a piece of 12” x 12” cardstock at
    1 1/4" intervals. Turn the paper over and lightly sand the ridges using a sanding block.
    • If the Sorbet background doesn’t match your particular color scheme, substitute Olive, Juniper, Desert Sand, Crème Brulee, or Cocoa cardstock for it.
  • Attach the eyes, beak, wings, and belly to the body, using 3-D foam tape on the wings and beak. Be sure to outline the entire wings and beak with foam tape and add some in the middle to make sure it’s sturdy.
  • Attach the finished owl body to the cardstock base then attach the whole thing to the canvas using Liquid Glass or Mod Podge.
All Papers are CTMH (Close to my Heart)

Tuesday, October 11, 2011

Buttoned Up Card Set: Project Inspiration Autumn/Winter 2011 Idea Book

This super cute video features a great little stamp set that works for upcoming holidays AND any occasion you want to use a star! I love how there are little stamp images that fit in the different circles on the star and tree. So versatile! You can use the tree with just the stamps; stamps and buttons; stamps and bling; buttons and bling... the possibilities are only as limited as your imagination!


Try this stamp set for yourself. Send me a message and I'll order you one today!

Thursday, October 6, 2011

Scrapbook Layout with the CTMH Cricut Art Philosophy

Technique Thursday:
3D Flowers using the CTMH Cricut Art Philosophy cartridge
So I have been playing around with the new CTMH Cricut Art Philosophy cartridge and have found the 3D flowers to be super awesome! There are over 700 images on this cartridge that has been released only through CTMH (Close to my Heart) and there are quite a few 3D projects to do. At the end of the booklet are the 6 different flowers you can cut out. The process for making them is super easy and the end result is so cute!
After you cut out your flower image out at the size you want, pick it up and start rolling the flower from the outside end around and around (using a piercing tool, wood stick for rub-ons, etc). When you get to the center of the flower, or the larger circle, stop rolling. Release your grip on the flower and let it loosen to get the desired look. You may want a tight flower or a nice open loose flower. Put liquid glass, a glue dot, or other adhesive on the flat base and press the entire flower firmly into the adhesive. Make sure you press in the center of the flower so it stays put. Then all you have to do is put your adhesive glue on the bottom of the flower and place where you like! It's that easy! Take a look at the cute layout I made with a bunch of the roses I made using this CTMH Cricut Cartridge!


I love this layout, what do you think?

Wednesday, October 5, 2011

Happy Haunting Layout


Trick or Treat! Fall is the time for colors to change, pumpkins to carve, and of course little spooks going around in funny costumes. If you are like me, you love this time of year; getting all prepared with childish excitement for a holiday that is not just for the children anymore. With adults only Halloween parties out there there is lots of fun for us grown ups out there. And what better thing to do with your photo memories than to scrap them! I made a super fun layout perfect for the Halloween holiday coming up. Electric with greens, black, orange and a hint of brown; this layout is jazzy enough for the kids or adults. Check out the details of the pages! Intricately cut images of pumpkins, bats, spiders and webs, and a large Frankenstein head. There is space for at least 4 photos, up to 6 or 7! Large photo is 8×5.5″ and three black boxes are 3.5×3.5. The photo can completely cover the black or photos can be 3×3 with a black mat. Lots of space to journal if you wish or leave it blank for great white space! Sheer orange ribbon graces both pages and three die cut tags are sewn onto the page with ribbon and embroidery floss. Title of layout is “Happy Haunting”. What kind of things do you like to do with layouts for Halloween?

Saturday, October 1, 2011

simply sophisticated


Simply Sophisticated

Fill in the Blank stamp Set artwork on blue background
“Simplicity is the ultimate sophistication,” said Leonardo da Vinci, and who could argue with that great artist? The seeming simplicity of the My Acrylix® Fill In the Blanks stamp set (D1465) is what makes it such a perfect—and perfectly versatile—addition to any stamper’s toolbox!
Fill in the Blank stamp set image
The words and outline images that make up this set really lend themselves to a variety of looks and techniques. Let’s take a peek at some artwork!
Follow Your Heart triple butterfly card image
The butterflies on this card are stamped tone-on-tone using the small butterfly image from the Fill In the Blank set, and then we took word stamps and stamped them in first and second generation to create our own patterned paper.
These Are The Days 12 x 12 layout image
We’ve also used the small butterfly stamp on this layout, but can you guess what other stamp we used from the set? If you guessed “flower,” you’re right! Since our My Acrylix stamps are flexible, we’ve scrunched up the flower stamp in different ways to get these cute cloud images. We stamped them on B&T Duos® paper to give them a subtle pattern.
Cherish The Day butterfly card image
For this card, we cut out the large butterfly stamp image a few times and then layered it to make it dimensional. Here are the steps so you can make it yourself:
  1. Stamp butterfly with Desert Sand ink on Colonial White cardstock. Using a craft knife, cut along wings, leaving body intact. Mount cardstock piece on Cocoa cardstock and Bamboo B&T paper. Pop up wings using 3-D foam tape.
  2. Stamp butterfly again on Crystal Blue B&T paper. Cut out entire image, omitting body. Mount on Colonial White butterfly using 3-D foam tape.
  3. Stamp butterfly a third time on Sweet Leaf B&T paper. Cut out entire image, including body, and mount on Crystal Blue butterfly with 3-D foam tape.
  4. Accent body with Opaques Mocha adhesive gems.

Bird card image, Spring/Summer 2011 Idea Book, page 96
Spring/Summer 2011 Idea Book, page 96
This card, featured in the Spring/Summer 2011 Idea Book on page 96, also shows the stamping on B&T paper technique. This time we used the bird stamp, and the background pattern is much stronger. To give visual variety, we stamped the bird’s wing on a complementary piece of Grey Wool cardstock. Then, we stamped three different sentiments with Grey Wool ink, then highlighted one of them by stamping over it in Goldrush ink. This brings in a third color and makes the “friends always” sentiment stand out as the main message of the card.
Such a Pretty You card image, Spring/Summer 2011 Idea Book, page 96
Spring/Summer 2011 Idea Book, page 96
Does this card look familiar, too? It’s also from the Spring/Summer 2011 Idea Book on page 96. Check out the Hollyhock cardstock on the sides. We stamped the flower on it in a repeating pattern to make an abstract, subtle patterned paper. Notice how the petals overlap in various spots? This gives the flower image a whole new look!
Today  I Am A Runner 12 x 12 layout image
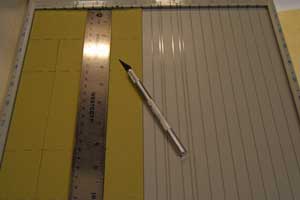
And here’s a final technique for you: using the stamp set as a cutting guide for negative space then filling it with a patterned paper to give visual interest. To create the stars you see in this layout, follow these steps:
  1. Stamp three stars on top of your layout, overlapping paper pieces and photos.
  2. Use a craft knife to cut out the center, leaving a 1/8" border, and distress the edges with a stipple brush dipped in Desert Sand re-inker.
  3. Stamp three 2 1/2" × 2 1/2" pieces of Colonial White cardstock with words or phrases, using Cocoa ink and first, second, and third generation.
  4. Attach the cardstock pieces to the back of your layout so the sentiments show through.
  5. Accent each star with a pair of Opaques Mocha adhesive gems to give them even more zing!
Have you created a fun project using the My Acrylix Fill In the Blank set? Post it on the comment section or on my Facebook wall. Be sure to label it “Fill In the Blank”—we’d love to see it!