Awesome

Monday, October 31, 2011

APG - Gift Card Pocket

I found this super cute card and pocket idea online and thought I'd share it with you. Watch the video below to get the instructions for making this project. If you are wanting to order this stamp set of any of the paper used in this project shown, let me know and I'll help you with that. Thanks for watching!

As our minds turn toward Christmas and giving, I look for any opportunity to make something quick and simple so that there's always a gift at hand. You never know when you might need to reciprocate or even give a trinket to someone whose spirits need lifting. Today I put together a very, very easy pocket that houses a gift card. Because the pocket and the gift card are separate, they provide lots of opportunity for embellishment. This project takes 1 piece of 12" x 12" design paper and 1 sheet of 8.5" x 11" cardstock, along with some scraps. With less than a 10 minute investment in time, you're going to a have personalized gift card pocket, ready to go.
Check out the video on how to make this super cute gift card and envelope.


Supplies used (all CTMH unless otherwise noted):
Paper:  Elemental B&T; Colonial White, Sorbet, Chocolate CS
Stamps:  Love Life, Wonderland, Card Chatter Birthday
Inks:  Sorbet, Chocolate
Embellishments:  Chocolate grosgrain, Mocha Opaques adhesive gem
Other:  1 1/4" circle punch, 2" circle punch (Fiskars), Doily Lace border punch (Martha Stewart), 3D foam tape, ScorTape (ScorPal), Score Board (Martha Stewart)


wondering how this was made

I found this photo and I am really wanting to know how it was done. Any ideas? I couldn't find any tutorial or instructions anywhere.
Help!


Sunday, October 30, 2011

Matchbook Mini Album Tutorial

Are you looking for a new idea for a mini album? This video is a great idea for a new and easy gift or brag book! Put any kind of paper on the album to dress it up for any occasion. This album is done up using paper that would be great for Christmas. Use some spooky cool paper for Halloween themes.
There are so many different options! This small album is so easy to do you can give them made up as gifts. Use lots of cool embellishments and die cuts to change up the look. Use lots of ribbon to get a fun frilly look.
How easy is this! Go ahead and try it for yourself today. Christmas is only two months away and it's time to start thinking about gifts and party favors. Happy Crafting!

Saturday, October 29, 2011

Pumpkin Doorhanger

If you want to have a cute project for Halloween tomorrow here's an idea for you. A super cute door hanger with easy pumpkins and a die cut tree. 
These cute pumpkins are easy to make using just circles and ovals. Take three circles and ink the edges. Starting with the center of the pumpkin place a circle off to the left and right of the middle pumpkin. (see photo) Do the same with three ovals. Cut a small strip with an angled top and put it behind the pumpkins at the top for the stem. Voila! You have made pumpkins! 
The die cut tree and the door hanger are done using the Art Philosophy Cricut cartridge with CTMH. 
Try yours today! Let me know how to get the new CTMH Art Philosophy cartridge. 


Friday, October 21, 2011

Sympathy Card With CTMH

Sometimes you need to have more than just thank you cards and birthday cards! This super cute Sympathy card is just perfect for anyone who has suffered a loss. This card uses The wonderful Elemental paper packet from CTMH. How cute is this! The strip of paper on the left that has circles is the new thing that CTMH has done with their paper. Each piece of patterned paper has a "zip strip"; a 1/2" strip of coordinating patterns that is attached to the top of the paper. You just slip the paper into your paper cutter and ... zip! You have a cool border for your project. Cool huh? 
This Sympathy card also us using the new CTMH Art Philosophy Cricut cartridge. The cute swirl is cut using the Cricut machine. It's so easy and great that you don't have to cut it out yourself. Also cut with the Cricut Art Philosophy cartridge is the banner at the bottom and the perfect circles. I'll bed you can't cut a more perfect circle if you tried!
If you want to make this card, send me a message to order this paper packet! And don't forget to get the awesome Art Philosophy Cricut cartridge! 
Happy Scrapping!

Thursday, October 20, 2011

Cute Card Box with CTMH

So here's a project that so easy anyone can give it a try!
Sponge all the edges of the box in a nice chocolate or cocoa ink.
Cover the surface of the box with coordinating CTMH paper.
Decorate as desired using dimensional elements and cardstock cut using the Cricut Art Philosophy cartridge. Make 3D roses and die cut shapes to stamp on.
How easy is that! Here are some other photo ideas!

Tuesday, October 18, 2011

Fall Wreath Using CTMH Art Philosophy Cricut Cartridge

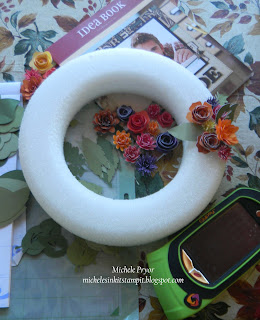
So I saw this super cute wreath and I am so going to make one too! Here are the photos and instructions...
"I used all the flowers on the Art Philosophy Cricut cartridge.  I designed it on my Gypsy so if I ever wanted to do another one like in Christmas Colors or for a Wedding I wouldn't have to start all over.  I designed it in 7 different layers on my Gypsy.  Each layer is full of flowers or leaves.  I maximized each layer with different sizes to fill my mat.  On the layer with the leaves I used 5 of each leaf in different sizes.  This way I would have a few of each size in one color since i am using 12 x 12 sheets of cardstock.  I can't believe how many flowers and leaves it took.
Here is the start.  After I placed the first few flowers and leaves I thought to myself, "what were you thinking this is going to take forever".  But then I also thought, yes but it will last forever too.

"For the flowers I used 4 sheets of 7 different colors.  It is the different colors that make this wreath pop.
I did roll all the flowers first to see what the different shapes and sizes looked like before placing them on the wreath.  I added the leaves as I went along.  I thought about placing them at the end but I could tell right away that it wasn't going to work." 

"I did use the hot glue gun to attach the flowers and leaves.  I did have fun placing and replacing the flowers and leaves before I glued them down.  I am so glad that I did not choose a larger wreath. 
Half way there and I need to cut and roll more flowers. I do love how it is turning out. I guess I should have counted how many flowers and leaves it actually took.  But I bet you can see the answer would be a lot!  LOL!  I really am thinking about doing one for Christmas now.
I just love the Art Philosophy cartridge it has so many useful shapes and goodies on it.  I couldn't live without it.  OK! OK! I could but it makes my life so much easier because it is so versatile.
You can order your Art Philosophy cartridge here if you don't have one yet.
So here is the finished wreath".

Lots of work I know!  But I do love it.
Let me know what you think.
All products used are CMTH unless stated otherwise

Cardstock colors for the flowers are:
Goldrush
Autumn Terracotta
Sunset
Smoothie
Gypsy
Sunny Yellow
Sunflower
Sizes were 5, 4, 3.5,3,2.5
The leaves:  were from the Mothers Day Bouquet Cartridge
Garden Green
Olive
New England Ivy
Sizes were 2, 1.75 I cut 5 of each color they were on one layer on my Gypsy
The wreath I bought at Beverly's it's 12".
Hot Glue I had on hand.


Pictures and instructions found at http://michelesinkitstampit.blogspot.com/