Awesome

Showing posts with label CTMH. Show all posts

Monday, April 30, 2012

Magic Monday Layout- Nelson

Magic Monday Layout is a fun way to feature different layouts that I have made or just fall in love with.
This week is a layout I made with old photos of my grandparents. It's so much fun to look at old photos and work with them! Of course these pictures were taken far before I was born and it gives me a glimpse into life at a different time...


 The little cabin you see of the left page is the old bunkhouse that slept 9 people! They lived in that while they built the cabin up in Sumpter, Oregon. And the baby that my grandpa is holding is of course my mom!
I used a layout from the CTMH book "Imagine". The paper used is from the retired paper "Wings". While this is not my favorite paper pack, I love the almost neutral colors on the backs of the B&T papers and I DO love the butterflies!
Here is a photo of the complete layout:
 
 All that's left is to do some journaling! Oh yeah, I used photo corners for these pictures because they are old and if I want to scan them into my computer it'll be super easy! Happy Scrapping!!!

Monday, April 23, 2012

Magic Monday Layout- A Good Man

Magic Monday Layout is all about new and fun layouts that I see or have created that I love!
This week it's a layout I did featuring my dad. I got some old photos and put them on a great CTMH layout.

I am using some retired CTMH papers for my layout. Because I want to preserve the photos I am using photo corners instead of using adhesive to stick the photos down. Because I used photo corners, I can later scan the photos or make copies!

These old photos are not standard 4x6 photos so I had to improvise some with the layout of the pictures. I will add some journaling and then I will be done! Don't you just love how easy it can be to do a layout?
Hope you enjoyed this post. Leave a comment to let me know your thoughts.
Happy Scrapping!

Monday, April 16, 2012

Magic Monday Layout- A Lovely Lady

So I'm back from the land of the sick child! Today is Magic Monday layout day and I have a mostly done layout I just did. I am really loving it so far.
I got some great pictures of my mom when she was younger (and my age too) and decided to make a layout.

I used CTMH paper that's retired. Silhouette is one of my favorite papers! And I used a layout from the Originals book. I love that if I am feeling stumped or just don't want to think too hard about cutting paper, I can just open a CTMH book and browse through different layouts and find one that works for me. Super easy!
I still need to do some journaling and add some fun embellishments before I am finished. Also, because I used old original photos, I did not glue them down to the paper. I used photo corners to preserve the photo as much as possible. And if I ever want to scan them into my computer, I can just pop them out and back in!
Wasn't my mom a hottie! She is still a great little lady and I love her very much! Next week stay tuned for a layout featurning my daddy!

Monday, March 26, 2012

Magic Monday Layouts -- Week 9

Magic monday Layouts
This week I am back to scrapbook layouts that I love!
This layout was done using the CTMH paper Miracle. It was a special that they were doing and I couldn't resist the cute layouts.
This cute layout features my brother and his kids. I love the colors that are used. A nice subtle combo of blue and green and cream.
As an extra cool bonus I made the photos on the right side do a cool thing. See?

The photos are in "flip-flaps" to make even more spots for photos. I cut a slit in the 12x12 page protector and adhered the flip flaps onto the page through the slit. I could have just stuck the flip flaps onto the outside of the page protector and not cut at all. You can choose how you want to do that.
If you want to add photos to your layout without adding clutter to the look try adding flip-flaps from CTMH. They are pretty awesome!

Wednesday, March 21, 2012

Using Stella Papers From Jeanette Lynton's blog!

Today’s spotlight comes from another wonderful Close To My Heart Consultant. Vicki Wizniuk, from Charlie Lake, British Columbia, fell in love all over again with the wonderful products from the Spring/Summer 2012 Idea Book. She said her heart has been stolen by Stella’s sweet, fresh, and funky papers; take a look at the beautiful artwork she did:
Wouldn’t you love to be on the receiving end of this gorgeous gift bag? I love how the cut-out piece from the handle turns into a perfectly complimentary flap. You’ll recognize the flourish from The Best Things stamp set and those fresh flowers from the Paradise Paper flowers really liven this up. To top it off, Vicki pleated some Lagoon cardstock to line the inside edge of the bag.
As if the bag was not gift enough, Vicki also made a 3” x 3” card to go along with it, using a pattern from Wishes. She also used many of the same products to tie the two items together. Did you notice the faux stitching she added in using her Chocolate marker? She used her ruler to keep the lines straight and then pierced holes every ¼” using the piercing tool.
This was posted on Jeanette Lynton's blog: jeanettelynton.com

Wednesday, February 15, 2012

Magic Monday Layout-- #5

Magic Monday Layouts
(sorry this got in a little late, I need to schedule my blog better!)
Monday Madness Layout is a fun blog I am doing about different layouts I have done. I hope you get some inspiration!
This fun layout was done for my little boy. It is not CTMH paper (or ribbon or tags), I think the cream paper is DCWV Nursery Stack; but I still really love how this turned out.  My baby was right about 4 months old and loved his bathtime! I tried to capture some of his splashing and movements with my photos.


I placed the middle ribbon "just right" so it covered all the essentials! I found I had some fun felt circles from CTMH Felt shapes so I made some bubbles with them. I think they turned out super cute!!!
I have not yet gotten around to journaling but hopefully that will come soon. :)
Bathtime photos are too cute not to be saved and passed around to future girlfriends! I hope you found a fun way to display a series of photos. This would work for showing the progression of seasons, growning kids or anything that changes over time!
Have some fun scrapping!

Tuesday, February 7, 2012

Magic Monday Layout #4

Better late than never. I didn't get to do the blog yesterday but here you go! Monday Madness Layout is a fun blog I am doing about different layouts I have done. I hope you get some inspiration!
This fun layout is done using a retired CTMH paper... Bella! This super cute paper pack may be retired but you CAN still get it using StudioJ.com. I love the cute stamps that are "buttons" and the pretty flowers are a great set of colors. My cute kids are at the park and loving the sunshine!


As you can see there is more than one way to embellish a layout! Don't think you have to use real buttons or tons of ribbon or bling. Simple photo mattes and some stamped flowers and buttons make this layout super cute!
What kind of thing do you use in your simple layouts? Do you like to use stickers? Brads? Stickles? Or just lots of fun different papers?

Friday, February 3, 2012

Valentines Cards for Stores

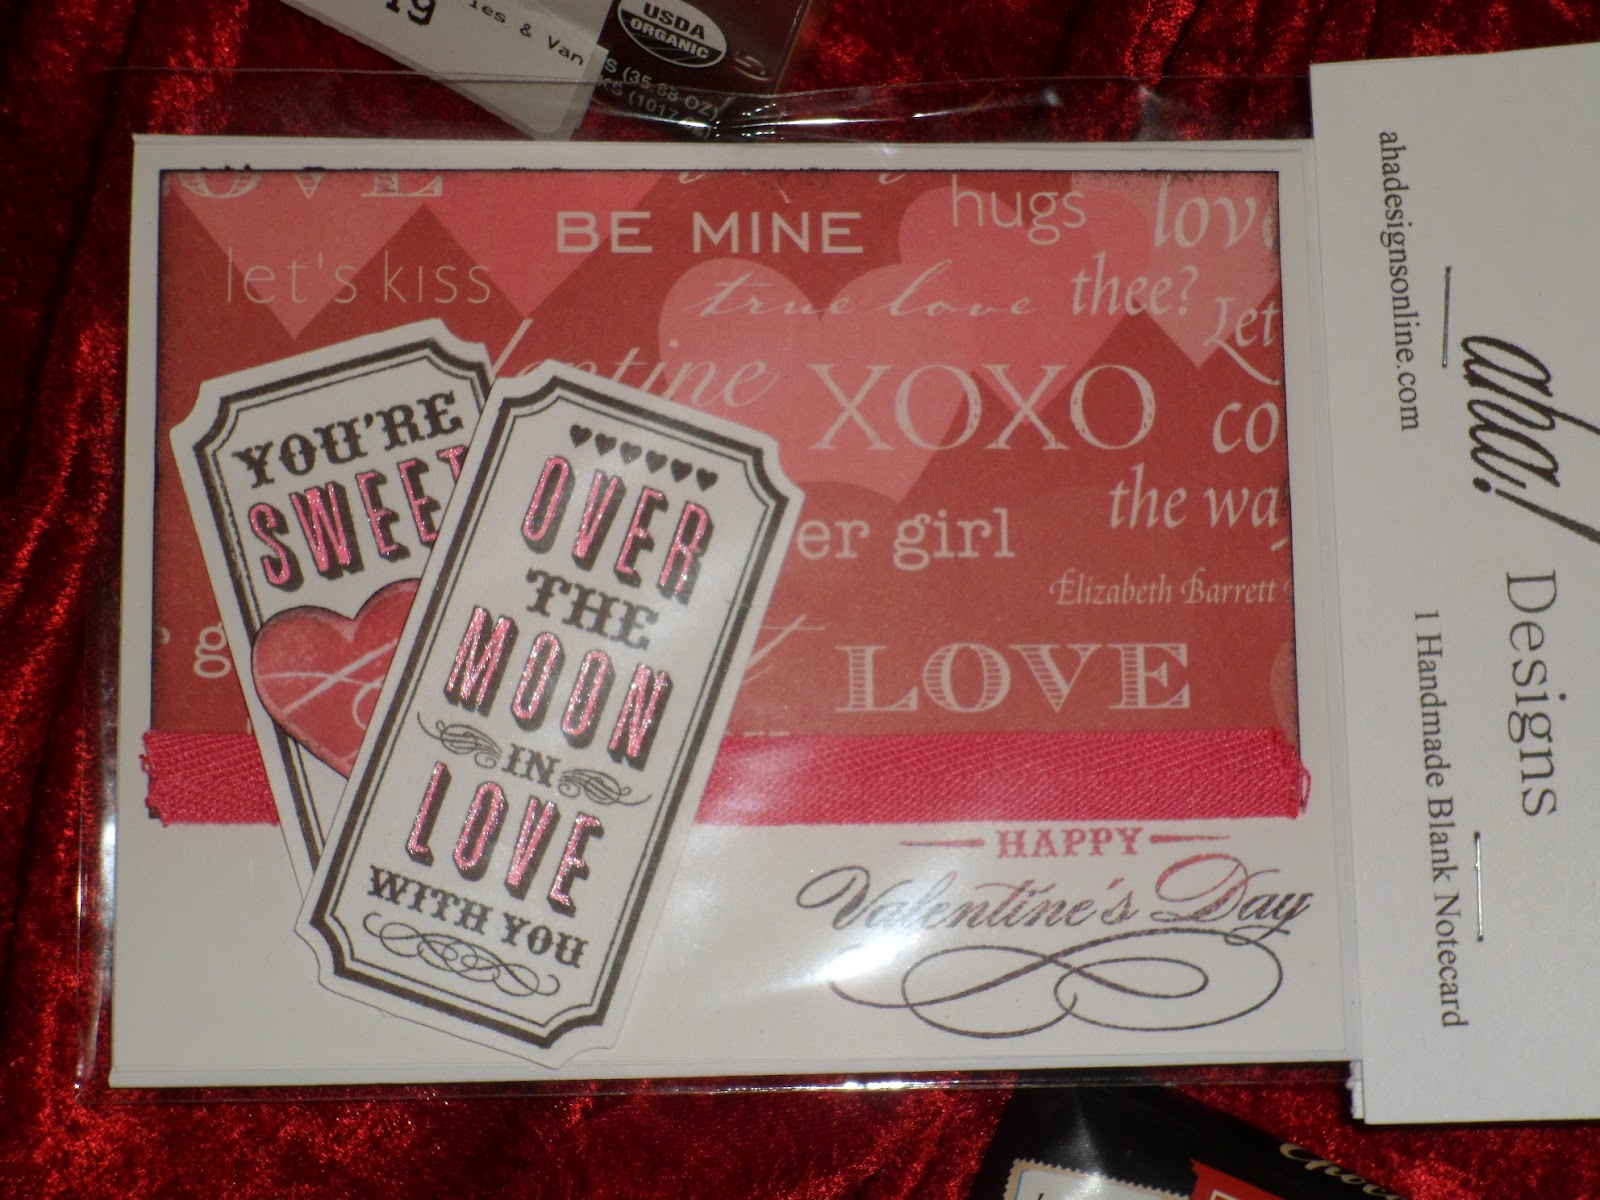
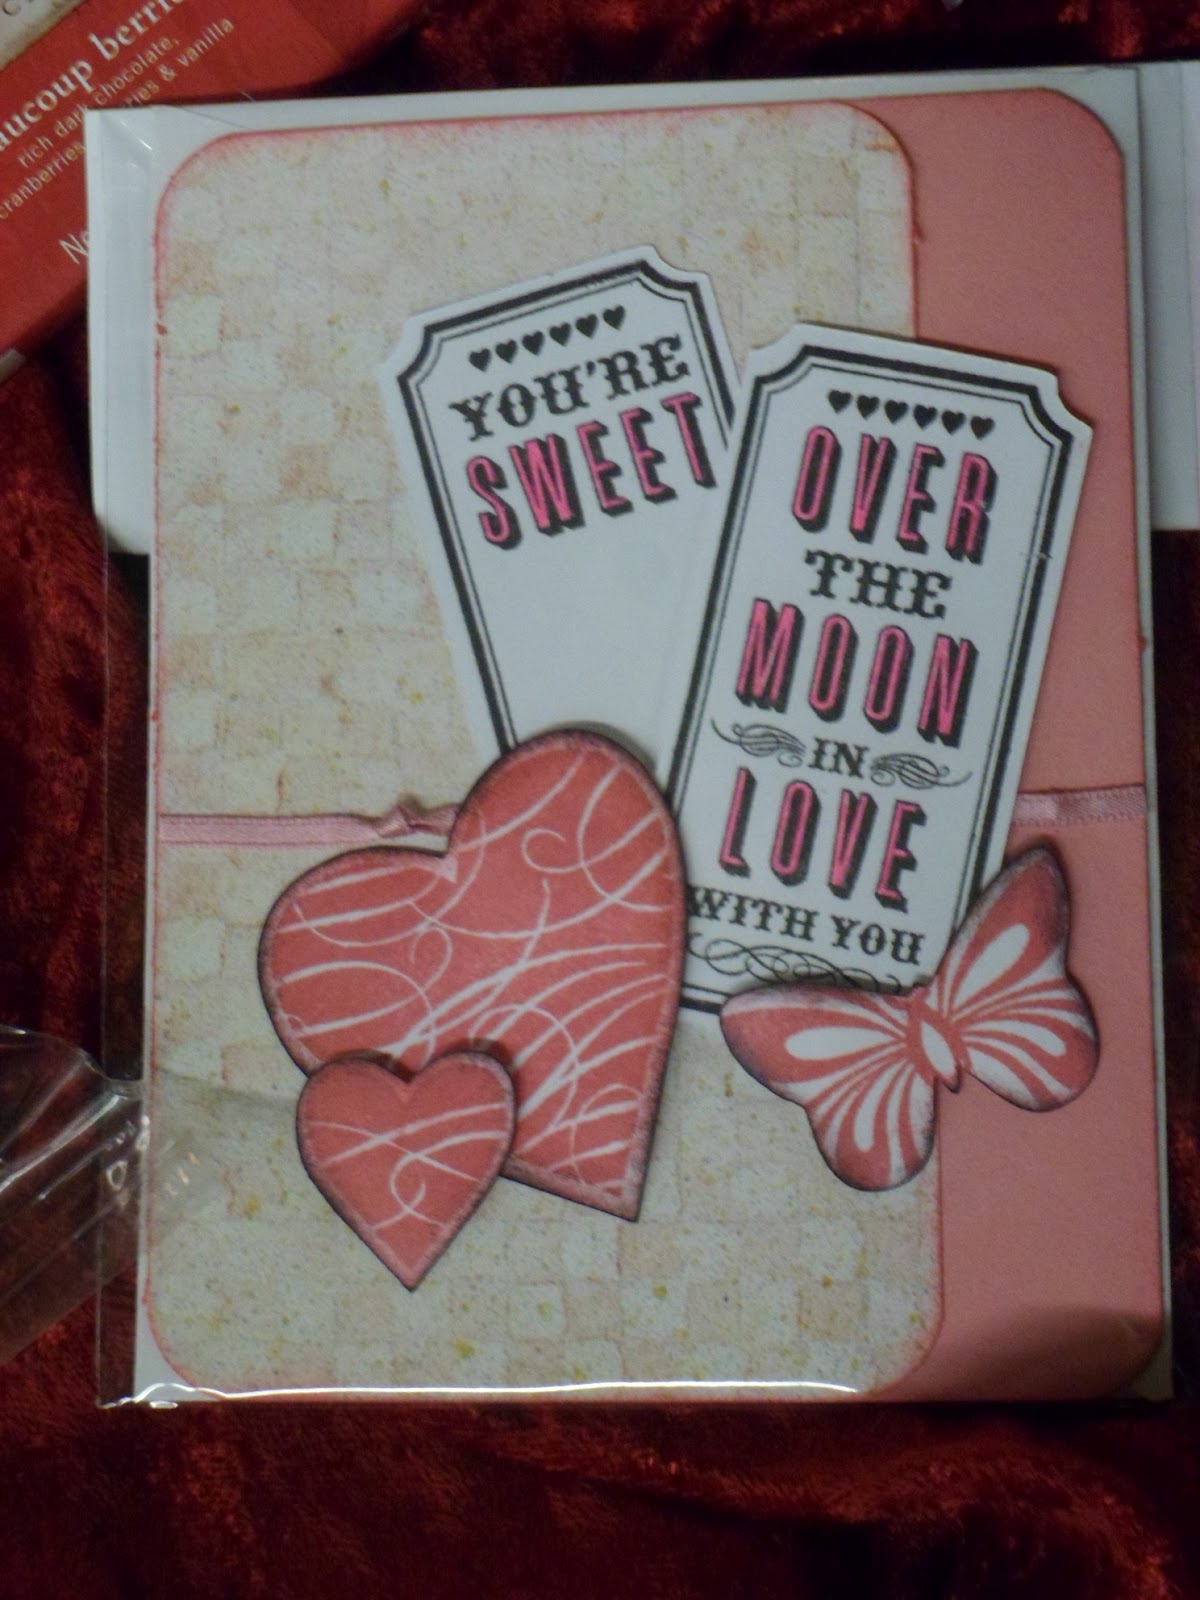
I have been working on some fun cards for Valentines Day to put in some local stores!
I used a stamp of the month for these from CTMH, how cute are they!


If you remember the stamp set it has some pretty hearts and a "ticket" that says Over the Moon in Love with you". Now I wanted to have more "tickets" that said the other things so I used a post-it to mask the inside text to just stamp the outside lines of the "ticket". I think it turned out super cute!
Here is the stamp set:
I love how the hearts, ticket and circle shape can be cut out using the Cricut Art Philosophy cartridge. It made the projects so much easier. Now if I could have a machine to ink the edges.....
Happy Crafting!

Monday, January 30, 2012

Monday Madness Layout-- 3

Monday Madness Layout is a fun new blog I am doing about different layouts I have done. I hope you get some inspiration!
This layout was done using CTMH paper (now retired) that you can find on StudioJ.com now. I love this layout and want the pictures to be just right so for now it's still blank. I love the colors and the floral paper used too.

This layout can fit three or four photos and a spot or two for journaling. Can you find the hidden journaling spot?
I also love the colors used... pink, brown, sorbet and cream. See the fun details like the partial circle of hearts and the brads in the middle of the flowers. This uses mostly stickers but you can use your cricut Art Philosophy cartridge to cut some fun hearts too!
Did you find the hidden journaling spot yet? It's on the left page behind the branch on the brown cardstock!!! Super cool!
It is actually a sticker but if you put corn starch on the sticky side it de-stickys it and you can use it as a moveable journaling circle!! Cool huh?
I hope you found some inspiration with this. Have fun scrapping!!

Monday, January 23, 2012

Monday Madness Layout-- 3

Monday Madness Layout are a fun way to see some layout ideas and get motivated to start scrapbooking!
This fun layout features my daughter of course! Her 4th birthday was a hit with the funky cake that is supposed to look like a princess castle and a princess hat pinata that I made doing paper mache. It was too sturdy and the kids couldn't break it open.
Enough about my decoration woes! I used fun pinks and browns for this layout and I think it turned out pretty girly! The title "Birthday Girl" is done using a modified "Rock N Roll" technique I learned from CTMH.
Here's the steps:
First ink up the stamp in the lighter color (here I used pink)
Next put just the bottom of the stamp in the darker color (here, brown)
Place firmly on your paper! You may need to "huff" on the stamp to get a clean sharp image.

The word celebrate is done using a fun glitter rub-on from CTMH.
That's it! Hope you find some inspiration!
Happy Scrapping!

Monday, January 16, 2012

Monday Madness Layout --2

Monday Madness Layout are a fun way to see some layout ideas and get motivated to start scrapbooking!
This week I'm featuring a layout I did using the traditional scrapbook style. (to you non scrappers out there that means cutting your own paper and using tape)
This layout portrays my daughter leaping off the couch onto a pile of couch cushions. I had to take a bunch of pictures to get these four shots! (Yay for digital cameras!) I used CTMH Tinkerin paper packet (now retired)
 and had a lot of fun with the gears. This is probably a more boys paper but it works for my girl who is very rough and tumble. :)
Now I know that CTMH has some layout design books; and I even have one of them, but I ended up just playing around with the paper and photos and made a layout all my own this time. The large letters "JUMPIN AROUND" are from the stamp set Posterboard and are super easy to cut out. I stamped onto some cute background paper to give the letters some texture. Nice! I'm certain the paper pack is retired now but I'm not sure about the stamp set. I think the alphabet is an E-sized stamp set and still available. If you are interested in getting it, I will find out for you.
Tune in next week for another layout!
Happy Scrapping!!

Monday, January 9, 2012

Monday Madness Layout--1

Monday Madness Layouts is a new blog I'm going to be doing just for fun! I am going to be featuring a different layout that I have done each week so make sure you come back to see the newest stuff!

The very first layout I'm going to feature is a layout I did using Studio J (CTMH). They have lots of papers and layout options available and you can even customize the layout to suit your needs! It's so cool!

See this one? I added all the buttons in different colors on the left page and made this super unique!


I just LOVE the colors of this paper pack called Magnifique. Studio J has tons of old papers that CTMH has retired and there are even some that are exclusive to Studio J online!
You are only limited by your imagination! The best thing about Studio J is that if you want to use a brad or button in a color you don't currently have in your stash, you don't have to buy the whole package! Same with the stickers, ribbon, thread... Speaking of thread. It's waaaaay easier to put a bunch of buttons on and "thread" them with this website. No more sticking your fingers with needles. No more frustration trying to thread the needles!
Plus, you don't like the color of thread you used? Just click on it and change the color! Super easy.
I won't be giving up my traditional scrapbooking any time soon but I have to admit this is a great tool. It's easy to catch up on the old pictues you have stashed in shoeboxes in the closet.
Come back next week for another Monday Madness Layout!
Happy Scrapping!

Monday, January 2, 2012

Vase Home Decor using CTMH

Vase
Vase
  • Cut out 130 2" scalloped circles from Grey Flannel cardstock using the shape on the Cricut® Art Philosophy cartridge (Z1686) or by punching the circles using the 2" scallop circle punch (Z1392).

  • Staple the circles together in stacks of five.

  • Squeeze and scrunch the edges then adhere two stapled sets together on the flat sides to create a spherical shape.

  • Sponge edges with Grey Flannel ink if desired.
  • Place the finished flowers inside a glass carafe or vase.
  • Wrap Sweet Leaf ribbon from the Designer Ribbon green collection (Z1616) around the neck of the vase to accent.

Sunday, January 1, 2012

Art Canvas using CTMH!

Art Canvas
Art Canvas
  • Cut a piece of cardstock to the size of your canvas. (Tip: Do all your stamping and inking first before attaching the cardstock to the canvas.)
  • Select four or five alphabet stamp sets, varying the size and styles. (Tip: You can create this “subway art” look with whatever alphabet sets you have on hand.)
  • Choose a few simple icon stamps to fill in empty areas.
  • Play around with the placement and spacing of the letters and icons before stamping.
  • Stamp the words and icons with black StazOn® ink.
  • Attach the finished cardstock piece using a thin coat of Mod Podge applied to the canvas.

Saturday, December 31, 2011

Make a Desk Calendar with CTMH!

Ah, home sweet home, where we get to decorate to our heart’s delight! Add these beautiful DIY dècor pieces to your home to live inspired every day. We’ve chosen a sleek color scheme of Grey Flannel, Black, and White Daisy, with a pop of Pear, and we used the graphic flowers from the My Acrylix® Dreamin’ Workshop set to add subtle texture to the White Daisy paper in the desk calendar and art canvas. Here are a few hints for you as you create these chic projects.
Desk Calendar
Desk Calendar
  • Create the triangular base of this calendar by folding a 12" × 12" piece of chipboard at the 3" and 7 1/2" marks.
  • Insert three pins from the Bling assortment (Z1466) and clip the sharp ends if they protrude too much. (Tip: You can use hot glue on the back to anchor the pins.)
  • Cut twelve 3 1/2" scalloped squares from Pear cardstock using the shape on the Cricut® Art Philosophy cartridge (Z1686) and sponge the edges with Pear ink.
  • Cut twelve 3 1/2" squares from Grey Flannel cardstock and sponge edges with Grey Flannel ink.
  • Use the 3" chipboard squares from the My Creations® memory game (Z1614) for the date tiles. Stamp the background flower pattern in second generation using Grey Flannel ink and then stamp the month or numbers with black StazOn® ink. Sponge the edges with Grey Flannel ink. (Tip: Stamp two of numbers 1 and 2. Stamp one each of numbers 3 – 9 and 0.)
  • Back each month and date tile with the 24 pieces of cardstock and then punch a hole in the top for easy hanging.

Friday, November 4, 2011

Fun idea for Pumpkin Seeds CTMH Pumpkin Basket

Hey there all! Jeanette Lynton's blog has this super cute idea for a cute basket using a new technique with your acrylic blocks.
I am loving this little basket with the super cute pumpkin set "So Grateful" (B1395). As for the stitching, you can either do actual stitching or stamp stitching. If you don't have a stamp set with stitching lines, just use a brown sharpie marker and faux stitch to your hearts desire!

This basket is made using the Art Philosophy Cricut cartridge (Z1686). Just put the basket together and fill with roasted pumpkin seeds in a cello bag. Tie off the bag with some hemp and top it off with a cute tag. Done!

 Hope you can give it a try! Happy Crafting!

Wednesday, November 2, 2011

Merry Christmas with Believe CTMH Paper

This should give you something to "Believe" in! This super easy and classic Christmas card is the thing for you! Using CTMH paper "Believe" and some cardstock and a button it's so easy and simple you can make a bunch of them at once for family and friends!
Make your card base at 4.25"x5.5". Cover with pretty Holiday Red paper. Cut white cardstock at 3.25"x4.5" and scallop the bottom edge with a pretty decorative punch. Cut a square of cool Believe CTMH paper at 3x3.5" and adhere toward the top of the white paper keeping the top and sides equal. Cut a strip of Sweet Leaf CTMH cardstock at 3.5x1.5" and sand the edges. Adhere about an inch above the bottom scalloped edge of the white cardstock. Take a die cut snowflake (using CTMH Art Philosophy) and place on Sweet Leaf cardstock. Get a Holiday Red button and thread with white waxy flax or embroidery thread and place in center of snowflake. Stamp sentiment on white above scallops and you are done! How easy is that!


If you want to order any of these products, let me know. There are less than two months left till Christmas so get crafting!

Tuesday, November 1, 2011

Dreamin Paper Pack CTMH

If I have to choose a paper that personifies the month of November for me it would have to be Dreamin'.  I love the fun pattern and earthy tones that are in this paper pack.

What a great color pallet to use for fall activities like going to the Pumpkin Patch, winding your way through the Corn Mazes, or making homemade applesauce! It's the perfect time of year to go get a bushel of apples and make some sauce!
I also love the way the paper seems to make photos seem to pop right off the page.This "X" style pattern with multi colors is so beautiful but yet does not detract from the photos at all.

The last photo I'll show is a card that is so dreamy! The idea of a dandelion puff and the beautiful fall tones makes this card so perfect. Yes, I guess I am just really loving this Dreamin' Paper pack from CTMH!
I hope you have some fun making your projects and if you want to get some of this super cute paper, just let me know!

Monday, October 31, 2011

APG - Gift Card Pocket

I found this super cute card and pocket idea online and thought I'd share it with you. Watch the video below to get the instructions for making this project. If you are wanting to order this stamp set of any of the paper used in this project shown, let me know and I'll help you with that. Thanks for watching!

As our minds turn toward Christmas and giving, I look for any opportunity to make something quick and simple so that there's always a gift at hand. You never know when you might need to reciprocate or even give a trinket to someone whose spirits need lifting. Today I put together a very, very easy pocket that houses a gift card. Because the pocket and the gift card are separate, they provide lots of opportunity for embellishment. This project takes 1 piece of 12" x 12" design paper and 1 sheet of 8.5" x 11" cardstock, along with some scraps. With less than a 10 minute investment in time, you're going to a have personalized gift card pocket, ready to go.
Check out the video on how to make this super cute gift card and envelope.


Supplies used (all CTMH unless otherwise noted):
Paper:  Elemental B&T; Colonial White, Sorbet, Chocolate CS
Stamps:  Love Life, Wonderland, Card Chatter Birthday
Inks:  Sorbet, Chocolate
Embellishments:  Chocolate grosgrain, Mocha Opaques adhesive gem
Other:  1 1/4" circle punch, 2" circle punch (Fiskars), Doily Lace border punch (Martha Stewart), 3D foam tape, ScorTape (ScorPal), Score Board (Martha Stewart)


Saturday, October 29, 2011

Pumpkin Doorhanger

If you want to have a cute project for Halloween tomorrow here's an idea for you. A super cute door hanger with easy pumpkins and a die cut tree. 
These cute pumpkins are easy to make using just circles and ovals. Take three circles and ink the edges. Starting with the center of the pumpkin place a circle off to the left and right of the middle pumpkin. (see photo) Do the same with three ovals. Cut a small strip with an angled top and put it behind the pumpkins at the top for the stem. Voila! You have made pumpkins! 
The die cut tree and the door hanger are done using the Art Philosophy Cricut cartridge with CTMH. 
Try yours today! Let me know how to get the new CTMH Art Philosophy cartridge.